Difference between revisions of "Managing VMM 2008 Library Servers"
(→Adding Shares to a Library Server) |
(→Adding New Library Servers) |
||
| Line 23: | Line 23: | ||
[[Image:vmm_library_resources_new.jpg|The VMM Library Resources pane displaying new library server]] | [[Image:vmm_library_resources_new.jpg|The VMM Library Resources pane displaying new library server]] | ||
| + | |||
| + | == Removing Library Servers == | ||
| + | |||
| + | A library server may be removed from the Virtual Machine Manager by right clicking on the server in the ''Library Resources'' pane in the top left hand corner of the VMM Administrator Console and selecting the ''Remove'' menu option. The system will calculate any dependencies and then display the following dialog: | ||
| + | |||
| + | |||
| + | [[Image:vmm_remove_library_server.jpg|Removing a library server]] | ||
| + | |||
| + | |||
| + | Once the library server has been removed from the VMM system, the files associated with the corresponding library will remain on the server which hosted the library server. These will need to be manually deleted if no longer required. | ||
== Adding Shares to a Library Server == | == Adding Shares to a Library Server == | ||
Revision as of 16:18, 20 February 2009
The Virtual machine Manager Library is a repository used to store a variety of virtual machine resources such as virtual hard disk and CD/DVD ISO images, virtual machine templates, stored virtual machines, virtual floppy disks and hardware, guest operating system profiles and Sysprep answer files. The primary purpose of the library is to promote re-use of information and objects in the creation and configuration of virtual machines deployed within the Virtual Machine Manager infrastructure.
A VMM Library consists of resources stored in a network share folder on the VMM Library Server system combined with information cataloged in the SQL Server database associated with the VMM 2008 installation. By default, the VMM Library shre folder is located in %SystemRoot\ProgramData\Virtual Machine Library Files and shared under the name MSSCVMMLibrary.
A VMM 2008 configuration can have multiple VMM Library Servers configured. The Library Server is commonly installed on the same system as the VMM Server, although for larger mission critical configurations, it is recommended that the VMM Library Server be deployed on a failover cluster.
Adding New Library Servers
When the VMM Server component is installed, the default VMM Library Server is also installed. Once this default library has been installed it cannot be removed or relocated to another server. It is, however, possible to configure VMm library Servers on other systems. This is achieved from within the VMM Administrator Console (for information on installing and launching the console read the chapter entitled A Guided Tour of the VMM Administrator Console).
New VMM Library Servers are added by clicking on the Add library server link located in the VMM Administrator Console Actions pane located on the right hand side of the console window. This selection will launch the Add Library Server wizard. The Enter Credentials screen requires the user name and password for a valid administrator on the specified domain.
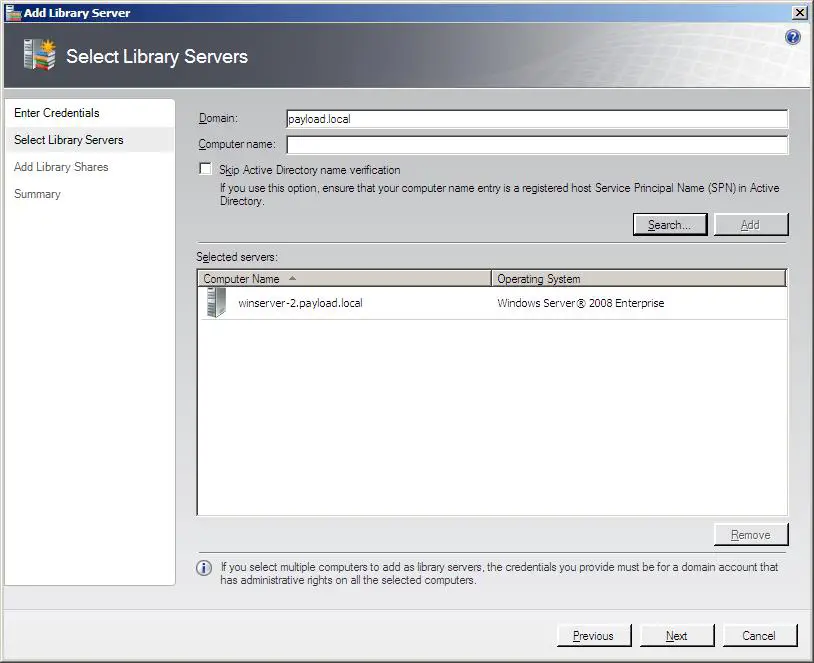
Once a valid account has been specified, the Next button displays the Select Library Servers screen where one or more servers may be designated as VMM Library Servers (see figure below). Enter the name of the server in the Computer Name field and click Add to add the server to the list, or use the Search button to search for servers by domain and virtualization type.
Once one or more systems have been selected as library servers, click Next to configure the network shares to be used to store the library files. During the preparation of this book, problems were encountered in adding shares during the library server creation process. If you encounter similar problems, shares may be added after the library server has been added by following the steps outlined in the section entitled Adding Shares to a Library Server.
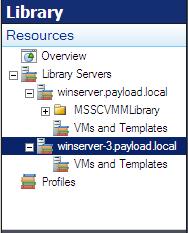
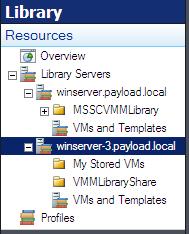
Once the library server configuration is completed, the new library will appear in Library Resources pane in the top left hand corner of the VMM Administrator Console:
Removing Library Servers
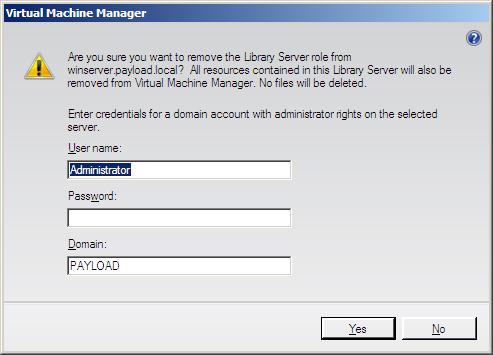
A library server may be removed from the Virtual Machine Manager by right clicking on the server in the Library Resources pane in the top left hand corner of the VMM Administrator Console and selecting the Remove menu option. The system will calculate any dependencies and then display the following dialog:
Once the library server has been removed from the VMM system, the files associated with the corresponding library will remain on the server which hosted the library server. These will need to be manually deleted if no longer required.
VMM Library Servers store files in network share folders. Shares are typically configured during the VMM Library Server installation process. Additional shares may, however, be added to a library using the VMM Administrator Console.
Before the shares can be added to the library, however, they must first be created on the VMM Library Server host. To do this, log into the system on which the library resides, enable network sharing and discovery if not already enabled, create the folders which are to be used as library shares and then share them by right clicking on the folders, selecting Properties and choosing the Share tab. More details on how to share folders on Windows Server 2008 can be found in the Configuring Windows Server 2008 File Sharing chapter of the Windows Server 2008 Essentials online book.
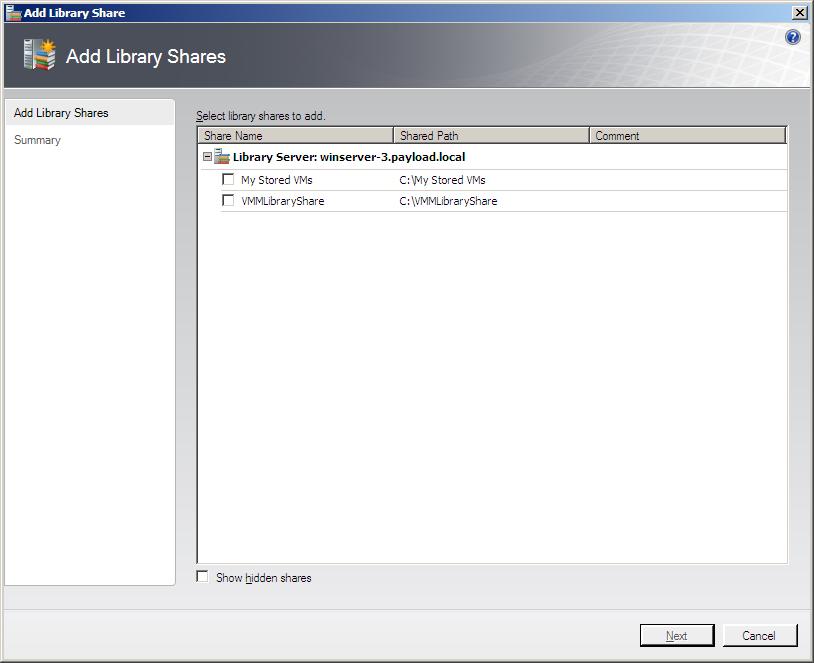
Once the shared folders have been created and shared, switch to the Library view of the VMM Administrator Console, select the library server to which the shares are to be added from the Library Resources pane located in the top left hand corner of the console window and click the Add library shares link in the Actions pane. The selection will invoke the Add library Shares wizard as illustrated in the following figure:
The first screen displayed by the wizard lists the network shares that were previously configured on the VMM Library Server host. Select any shares that are to be added to the library and click Next to proceed to the summary screen. Assuming the summary information is correct, click the Add Library Shares button. Once the addition is complete, the new shares will appear beneath the library server in the resources pane as shown below:
The shares are now available for the storage of virtual machine resources.
To remove a share from a library, right click on the share in the Library Resources pane and select the Remove menu option. A confirmation box will appear proving a warning that all files contained in the share will also be removed the Virtual Machine Manager. Once confirmation is given, the share will not longer be listed in the library. Although the share has been removed from the library, the shared folder and files contained therein still exist on the server hosting the library and must be manually deleted if no longer required.
Manual and Automatic Library Refreshes
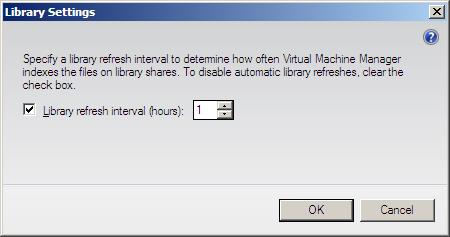
VMM Library Servers perform periodic automatic refreshes on libraries to re-index the library share files. By default, the interval duration is set at one refresh every hour. To change this setting to increase or decrease the frequency of these refreshes, choose the required library from the Library Resources pane in the VMM Administrator Console and select the Actions -> Library Actions -> Library Settings menu option. This will display the Library Settings dialog:
From within this dialog, automatic refreshes may be turned off or the duration modified to meet specific requirements.
A manual refresh of a library may be performed at any time by right clicking on the library and selecting Refresh from the resulting menu.
Adding Files to a VMM Library
To add a a file to a libray, simply copy the to the appropriate share folder on the library server system. Note that new files added to a library share will not show up in the library index until the next refresh is performed. To perform a manual refresh, right click on the library to which the file was added and select Refresh from the resulting menu.
