A Tour of the Hyper-V Manager Tool
Anyone deploying virtual machines using Microsoft Hyper-V will likely spend a considerable amount of time interacting with the Hyper-V Manager MMC Snap-in. As such, it is important to gain a good understanding of how to use this administrative tool. This chapter is intended to provide a basic overview of the Hyper-V Manager tool and cover the basics of using this tool to modify some key server settings.
Installing the Hyper-V Management Snap-in
The Hyper-V Manager snap-in is installed by default when the Hyper-V role is installed on a Full Windows Server 2008 installation. Given that the snap-in is graphical in nature, it is not installed on the command-line based Windows Server 2008 Core installation. The only way to manage Hyper-V on a Windows Server 2008 Core installation using the Hyper-V Manager is to do so remotely by running the snap-in on a system running a full Windows Server 2008 or Windows Vista installation.
To facilitate remote Hyper-V administration from systems that are not running Hyper-V, the snap-in may also be installed as a stand-alone tool on Windows Server 2008 and Windows Vista SP1 Enterprise and Ultimate editions.
Both the Hyper-V Manager snap-in and the Virtual Machine Connection tool may be installed on Windows Vista by installing the Windows Vista SP1 Management Tools Update package which is available for download from the Microsoft web site.
To install Hyper-V Manager on a Windows Server 2008 system which does not have the Hyper-V server role installed, perform the following steps:
1. Start Server Manager
2. Select Features from the left hand panel
3. Click on the Add Features link in the main panel to invoke the Add Features Wizard
4. Locate the Remote Administration Tools category in the list of features and click on the + to unfold the sub-categories.
5. Click on the + next to Role Administration Tools to unfold the list of features in that category.
6. Select Hyper-V Tools.
7. Click on Install to install the feature.
Launching the Hyper-V Manager
The Hyper-V Manager may be invoked using a number of different techniques, each of which will be outlined in this section.
- Administrative Tools Menu - Launch Hyper-V Manager by clicking on the Start -> Administrative Tools -> Hyper-V Manager menu option.
- Server Manager - Launch the Server Manager either from the Start -> Administrative Tools -> Server Manager menu option, or by clicking on the Server Manager icon in the task bar along the bottom of the desktop. When Server Manager is running unfold Roles followed by Hyper-V in the left hand panel by clicking on the + signs next to the corresponding item. From the Hyper-V branch click on Hyper-V Manager to display the tool on the main panel.
- Search - Click on the Start button, enter Hyper-V into the Search box and press enter.
Any of the above techniques will result in the Hyper-V Manager launching. The next step is to explore some of the features of this tool.
A Quick Tour of the Hyper-V Manager
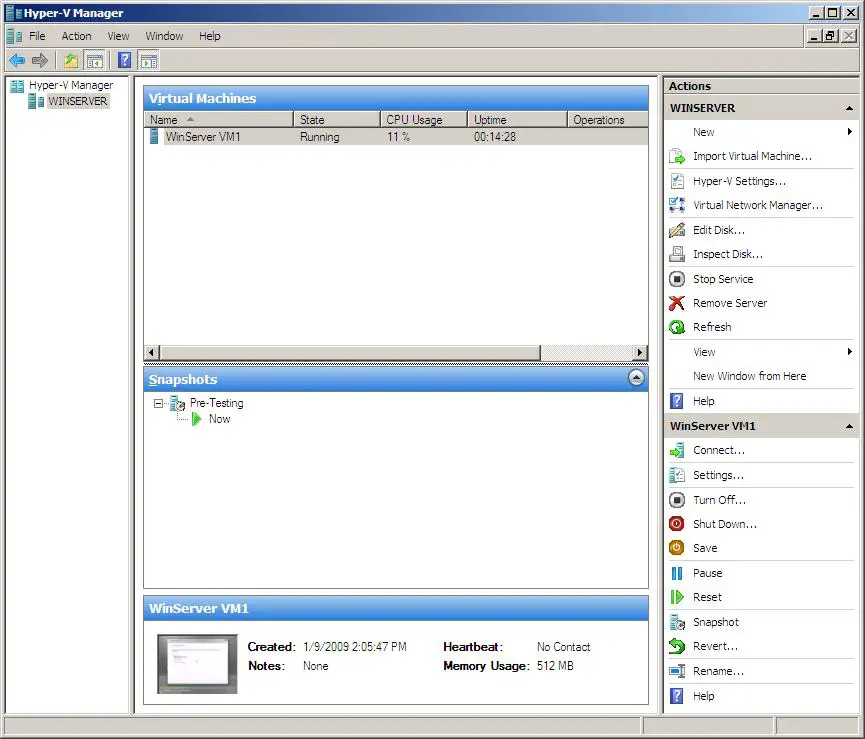
Once the Hyper-V Manager has loaded, it will appear as illustrated in the following figure:
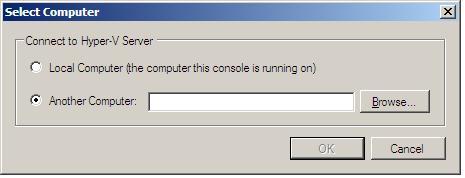
The panel running along the left hand side of the Hyper-V Manager window contains a list of Hyper-V servers which are available for administration. By default the local server will be listed, although remote Hyper-V servers may also be added to the list and managed from this Hyper-V Manager instance by right clicking on the Hyper-V Manager item in this panel and selecting Connect to Server.... When selected, this menu option will display the Select Computer dialog. From this dialog it is possible to select the local system (if it is not already listed) or to browse the network to find other remote Hyper-V servers:
Once connections to remote servers running Hyper-V are connected they will appear in the list along with the local system. Servers may be removed from the list by selecting the server from the list and clicking on the Remove Server link in the Actions panel on the right hand side of the Hyper-V Manager window.
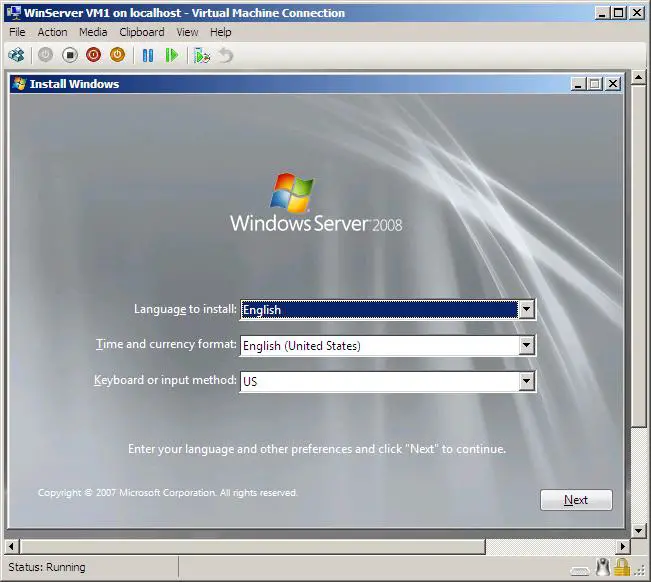
The central panel is divided into three sub-panels. The top provides a list of virtual machines which are configured on the server which is currently selected in the right hand panel. The list contains the name of the virtual machine together with CPU usage, uptime and operations information. When a virtual machine is selected from the list, a collection of actions for that virtual machine will appear in the right hand Actions panel. The same list of virtual machine specific commands may also be accessed from a popup menu by right clicking on the VM from the list. In order to view the console of a running virtual machine, select the Connect... action option. Another, quicker way to display the console for a virtual machine is to simply double click on the entry in the list. Once selected, the Hyper-V Virtual Machine Connection tool will appear displaying the console for the virtual machine.
The following figure shows the console for a virtual machine which is in the process of installing Windows Server 2008 as a guest operating system:
The central panel contains a list of any snapshots which have been taken for the selected virtual machine. Once again, selecting a snapshot from the list causes a list of actions to appear in the right hand panel. The same list may also be accessed by right clicking on a specific snapshot in the list.
The bottom panel displays additional information about the currently selected item (either a virtual machine or a snapshot).
Finally, the right hand panel provides a list of actions that may be performed. The top section contains actions specific to the Hyper-V server. The area below these actions displays context sensitive actions depending on the currently selected item. For example, if a virtual machine is selected, the actions offered will be related to that virtual machine. Similarly, with a snapshot selected, relevant actions for that snapshot will be displayed instead.
In addition to the panels outlined above, many of the same actions amy be accessed from the menu bar running across the top edge of the Hyper-V Manager window.
Customizing Hyper-V Manager
A certain level of customization of the Hyper-V Manager user interface is possible. In the first instance, the sizes of the various panel may be changed by moving the mouse pointer to the border of a panel. When in the correct location the point will change to a double headed arrow, at which point the border may be clicked and dragged to perform the resize.
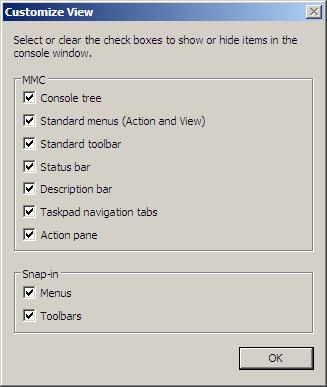
The specific panels which are displayed may also be configured by selecting View from the Actions panel and clicking on Customize.... The resulting window provides a range of check boxes which are used to control whether specific user interface elements are displayed or not:
Hyper-V Configuration Settings
The Hyper-V Manager provides the ability to make changes to a number of configuration settings relating to the overall Hyper-V system (as opposed to a specific virtual machine). These settings are accessed, not surprisingly, by clicking on the Hyper-V Settings... link in the right hand Actions panel. the configuration options and corresponding descriptions are outlined in the following table:
|
Option |
Description |
|---|---|
|
Virtual Hard Disks |
Configures the location of the virtual hard disks used by the virtual machines. This can be a folder on a local disk drive or a remote network based storage location. |
|
Virtual Machines |
Configures the default location of the virtual machine configuration files. This can be a folder on a local disk drive or a remote network based storage location. This default location may be overridden on a per virtual machine basis during virtual machine creation. |
|
Keyboard |
Most operating systems and applications have keyboard control sequences which have special meaning when pressed. The issue when running virtual machines on a system is that a decision needs to be made about whether the keyboard control sequences should be addressed by the host, or passed to the guest operating system running in the currently selected Virtual Machine Connection window. This setting allows a choice to made to have all control sequences handled by the host, always by the virtual machine or only by the virtual machine only if the corresponding Virtual Machine Connection window is in full Screen mode. |
|
Mouse Release Key |
When running a guest opearing system without the virtual machine drivers installed, clicking in the Virtual machine Connection window causes the mouse pointer focus to be locked into that window. The only way to release the mouse focus so that it can be used on the host desktop is to press the mouse key release sequence which defaults to Ctrl+Alt+Left Arrow. This default may be changed by selecting an alternate key sequence from the drop down menu. |
|
User Credentials |
When a user logs into a system they will do so using login credentials (typically a username and a password). Once logged in, the user may then use the Virtual Machine Connection tool to access the desktop environments of virtual machines. This configuration option instructs Hyper-V to use the credentials used to gain access to the local system to gain access to the guest running the virtual machine. If smart cards are used to gain access this option must be switched off and credentials entered manually when logging to a guest operating system. |
|
Delete Credentials |
Hyper-V will cache credentials used to gain access to guest virtual machines. To avoid potential security breaches, this option allows any saved credentials to be removed from the system. |
|
Reset Checkboxes |
Resets all Hyper-V checkboxes to the default values causing much of the Hyper-V management interface behavior to revert to just installed status. |


